
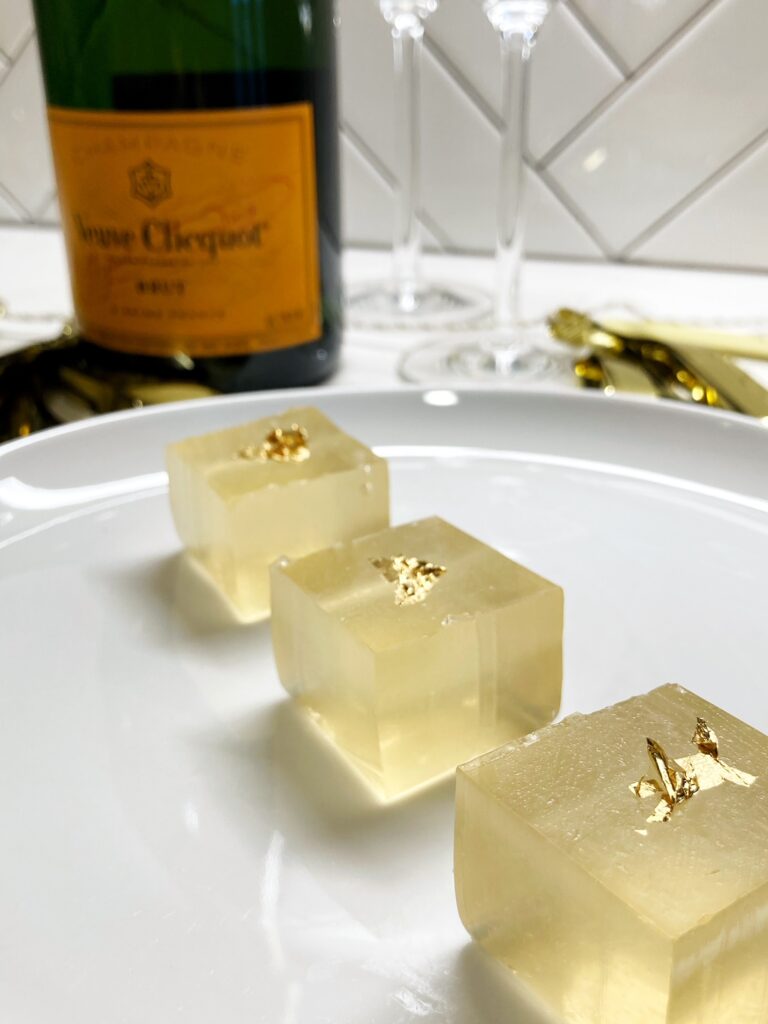
I’m fawning over these Champagne Jell-O shots I made for New Years Eve. When you think of Jell-O shots, you might recall those kind-of-trashy-yet-delicious ones you had in college or in your early twenties. Cherry and green apple and so on, in every bright color of the rainbow…You’d dig them out of a tiny plastic cup and have to admit: “These things are actually pretty great.” My Champagne Jell-O shots are an elevated version that is suitable enough for a more “grown-up” NYE soirée. But who are we kidding? We’ll still act like we’re 21 anyway.
Champagne Jell-O Shots Are Perfect For New Years Eve
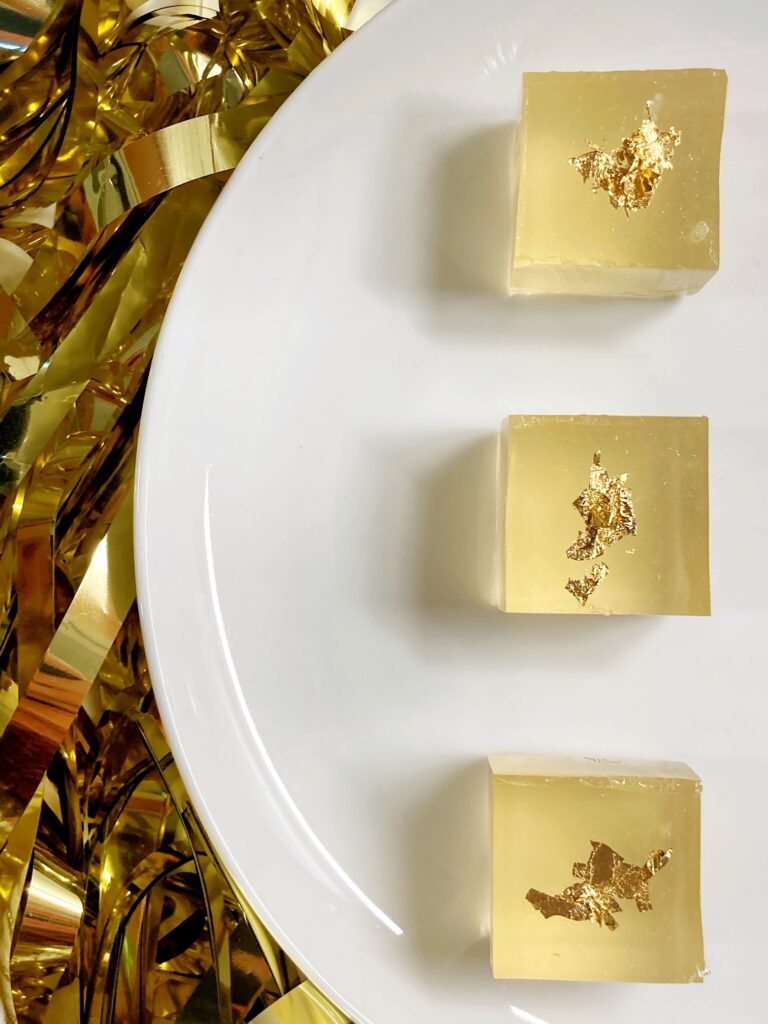
New Years Eve is a holiday that calls for all things glamorous and glittery and golden. Naturally, popping a bottle of Champagne is the perfect way to set the tone for the evening. However, Champagne Jell-O shots are a creative and fun addition to your NYE celebration. Top them with edible glitter or – as I did – edible gold leaf. Nothing feels quite as fancy as ingesting literal gold!
Because Champagne’s price point is a little high for making Jell-O shots, I’d recommend choosing an inexpensive sparkling wine for these. I bought a half-bottle size of Prosecco which could be used to make about 18 shots. Keep in mind – these “Champagne” Jell-O shots also have vodka in them so don’t be surprised when these little jiggly babies pack a punch. Indulge responsibly!
Want to learn more about the differences between Champagne and other sparkling wine? Read about my wine tour at the Biltmore Estate in North Carolina and why the Biltmore only winery legally allowed to refer to their sparkling wine as “Champagne”.
Skip the Plastic For an Eco-Chic Presentation
If you’d have Jell-O shots before, they’ve likely been in small plastic cups. Great for transporting to a massive party but not very pretty. Instead, nix the plastic (a plus for the environment as well!) and just use a square or rectangular dish to mold the Jell-O. Once it is firm, slice it into perfectly chic little cubes. This presentation is much better for an elegant party. Cheers!
Print
Champagne Jell-O Shots
- Prep Time: 10 minutes
- Cook Time: 6 hours
- Total Time: 6 hours 10 minutes
- Yield: 12 shots 1x
- Category: Cocktail
- Method: Chilling
- Cuisine: American
Description
A grown-up version of the classic Jell-O shots. These Champagne Jell-O shots use sparkling wine, vodka, and lemon juice to create a fancy and festive treat for New Year’s Eve.
Ingredients
- 1 cup Prosecco (or other sparkling wine)
- 0.5 cup vodka
- Juice of 1 lemon
- 0.25 cup light agave nectar
- 2 tbsp gelatin (2 packets of Knox brand) OR 1 tsp Agar-Agar*
- Edible gold leaf
Instructions
- Mix the juice of 1 whole lemon with the agave nectar. Stir well to ensure the liquids are well combined. Pour into a saucepan.
- Sprinkle the gelatin or agar-agar over the surface of the liquid in the pan. Allow it to sit for 2 minutes.
- Put the pan over medium heat and stir consistently until all of the gelatin or agar-agar has dissolved.
- Remove the mixture from heat and add your sparkling wine and vodka.
- VERY lightly grease a square or rectangular loaf pan or glass dish with oil. I just used a very light oil spray and used a clean cloth to spread it around the surface area of my glass dish. This step will ensure the Jell-o is easily removed once it is firm.
- Pour your mixture into your dish and store it in the fridge.
- Allow the Jell-O to chill until completely firm – overnight is your safest bet.
- Once the Jell-O is firm, gently remove it from the dish or pan. Slice it carefully into cubes.
- Garnish with edible gold leaf and serve!
Notes
*Agar-Agar is a vegetarian and vegan alternative to gelatin. The texture is slightly less smooth but is still a great option when avoiding animal products.

Sydney is a 31-year old American living in Paris. Originally from Pittsburgh, she has also lived in Milan and Cognac. She has a WSET Level 2 certification in wine, along with a degree in environmental engineering and an MBA. She loves exploring local farmer’s markets, haunting her favorite wine bars, and discovering new restaurants.

Made this and they turned out delicious! Can’t wait to serve them tonight
Agar agar did not set. Serving these as regular non-jello shots. Tried to fix it by adding more but still won’t set. Feeling sad about this result.
Author
Hi, Jessica!
Happy New Year! I’m so sorry your agar agar did not set! It is admittedly a much trickier ingredient than using standard gelatin. It can be very fickle and it can depend on whether you’re using powdered or solid. I am going to update the recipe with some additional tips for working with agar agar to ensure it sets.
Can this recipe be doubled for a 9×13 pan?
Author
Hi, Terry!
Yes, it can – but the dimensions of each “cube” may differ. It may take a little experimentation. Let me know how it went for you if you did try that out.
Happy New Year!
Sydney
Hi, what size pan did you use to get the thickness of the cubes you show? Did you also use one without a curved bottom/corners?
Author
Hi, Natalie!
I use a roughly 6-inch baking pan or dish, depending on what I have on hand. I have used a pan that has no curved bottoms and I have also used one that does have the curved edges.
I do recommend a using a baking pan without the curved edges for the aesthetic of the cubes but if you don’t have one, don’t worry! In the case of curved edges, you can very thinly slice the edges so you don’t waste too much but can still achieve that sharp corners.
I hope you enjoy them 🙂
Sydney